Hi
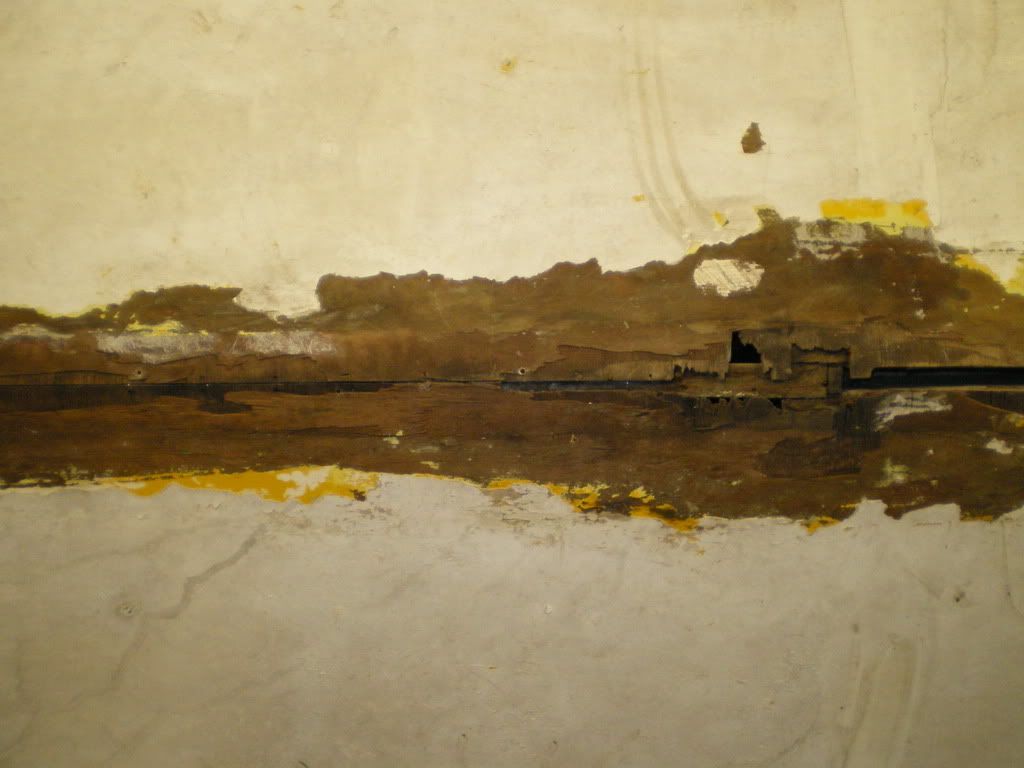
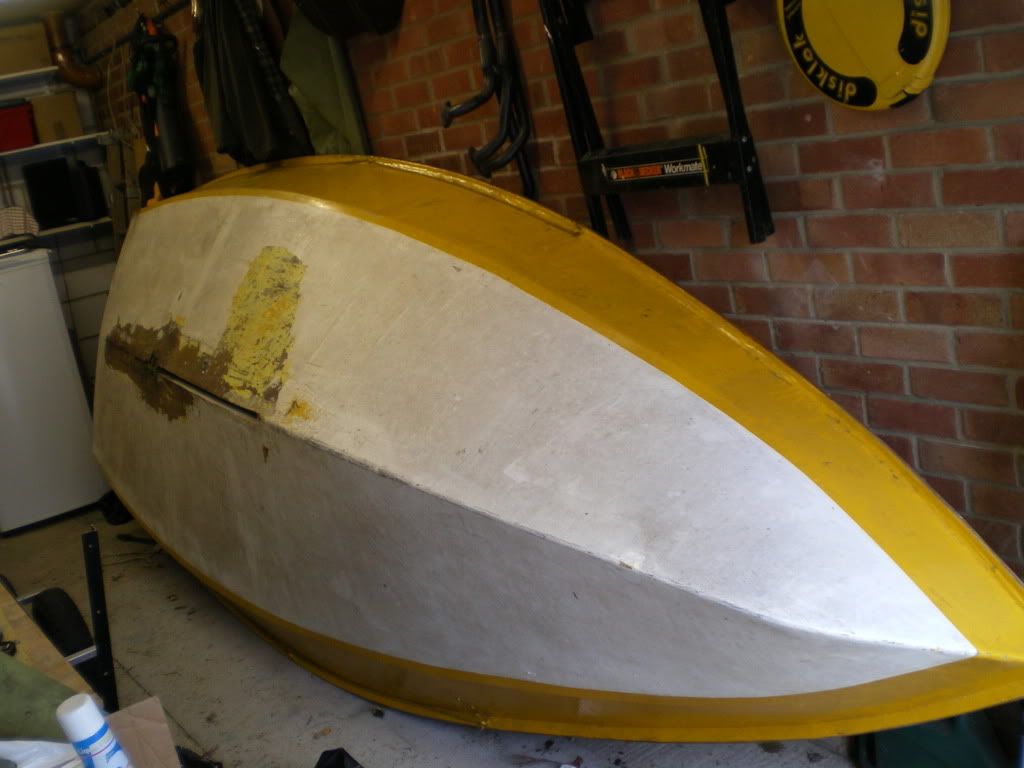
A few months ago I acquired and old wooden Phantom which I would like to get back on the water. Unfortunately water has got in under the hog from the rear of the centreboard case to to transom which means the ply their is going to need replacing (approx 5ft x 4inches either side of the centreline), see photos
http://i197.photobucket.com/albums/aa31 ... 99-007.jpg
http://i197.photobucket.com/albums/aa31 ... 99-006.jpg
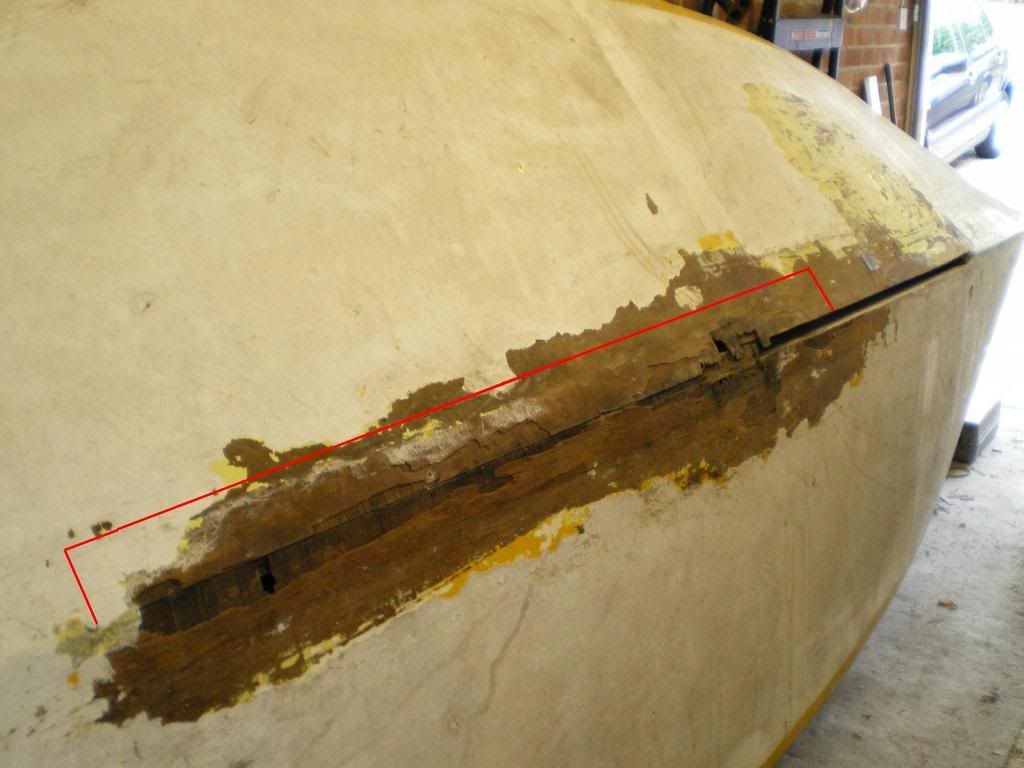
http://i197.photobucket.com/albums/aa31 ... 99-010.jpg
As the new peices will need scarphing in, which is beyond my ability, I need to find a dinghy repairer who for a reasonable cost could do the basic work for me i.e. cut the scarph joints and glue the new peices in place, I would then do all the finishing. I am based in Newbury,Berks so recommendations of anyone in central southern England would be great.
Cheers
Rich
Dinghy Repairer Sought
Rich
Best I can suggest are Stanley and Thomas, at Romney Lock, Windosr. Details are at http://www.stanleyandthomas.co.uk. Mark Stanley did an excellent job for me on just such a repair on my old Fairey Finn - cutting out a section of hull next to the hog and scarphing in a new piece. Not cheap mind, but perhaps worth considering.
Nick
Well, I'm cheap, anyway...
I'm somewhat tied up over the summer, now, I'm afraid for anything other than quick "in and out" jobs, as I've a couple of big projects on and school holiday kiddie minding looming.
Don't be so sure the scarping in of new bits would be too hard - it is only a case of getting a "pretty" joint on one side (I assume the inside is varnished) as a joint with a gap filled with epoxy can often be stronger than a neat one. A scarph can be made with such tools as surforms (the cheese gratery type things) and rasps, so you don't need fanstastic joinery equipment to do it.
Rupert
Unfortunately I own a surform and a rasp so I guess I've no excuses and ought to have a go myself, it's the only way I'm going to find out how difficult or easy scarphing realy is. The good news is it's paint both sides so any filler won't show. I'll try doing one side first and if I make a complete pigs ear of it then I'll leave the rest until after the summer when hopefuly Rupert could help out. However as this is my first attempt I have couple of dumb questions:
1) How wide should the scarph joint be? From what I can read some people say 8.1 ratio (i.e. 6mm ply = 48mm wide joint) where as the other school of thought seems to be 12.1( i.e 6mm = 72mm joint) I am assuming the 8.1 joint would be easier to cut, but would it be strong enough?
2)One long edge of the damaged portion is attached to the hog. When this damaged section (5ft long x 4inches wide, see photo) is removed will the ply around it distort because it has lost some of its attachment to the hog, and if so, should I then be able to pull it back into shape when the new piece is glued into place? Apologies if thats clear as mud
http://i197.photobucket.com/albums/aa31 ... GP0030.jpg
Rich
Rich
Using epoxy, the shorter scarphwill easily be strong enough. In fact, with so much of the wood supported on the hog, you would probebly get away with a 1" overlap. The boat should pull itself back into shape once you fasten the new bits of wood in, especially if you put plenty of weight on the join. If you want a really easy job and don't mind extra bits on the inside, you could always do a butt joint, where you glue ply inside the boat and then fix the new bottom on to that. It doesn't look as neat but has the advantage of strengthening up an area that tends to get trodden on a lot. My other recommendation is wood hardener (Ronseal or Cuprinol - can't remember which one is useable in an hour) - this kills off the rot in nearly sound wood and plasticizes it. Epoxy sticks to it, too.
Rupert
Rupert, thanks for the advice. I had thought about doing a butt joint with backing piece but had decided against it. Assuming I can get the boat fixed, then I want to add a small false floor over the area that takes the helms traffic so as to spread the load accross the hull. This will obviously add some weight so I didn't want to add yet further by putting backing ply behind a butt repair. The false floor may seem excessive but many wooden Phantoms seem to have a weakness in the floor so hopefully it will help extend the life of the boat. The false floor will mainly be supported on the hog and the stringers in the floor and will only be screwed in place so it can easily be removed if necessary.
Rich
-
jpa_wfsc

- Posts: 1188
- Joined: Sun Dec 04, 2005 9:52 pm
- Location: Oxford (Work) Coteswold Water Park (Sailing)
I dont think the fals floor will add much stiffness unless it is epoxied on - and is more than an inch or two off the floor.
From what I have seen the double bottom Phantoms are built using thinner ply than the Mk1 phantom, to stay down to weight. You can get stiffness by using thicker ply or by using geometric structures - doing both will be very heavy!
I used to sail a Phantom which was built by a club member at WSC. This had floors repaired once by scarphing in patches and the second time by cutting the entire floor out using a jig saw 2 inch from the tanks and hog, and scarphing a new floor in. Replacing phantom floors seems to be routine maintenance, not repair work - it is a big unsupported area and we phantom sailors tend to be built such that floor loadings are quite high!
j./
National 12 "Spider" 2523
Finn K468 'Captain Scarlet'
British Moth, 630, early 60's 'Pisces'
!!!! Not CVRDA !!!!
Comet Trio - something always ready to sail.
National 12 "Spider" 2523
Finn K468 'Captain Scarlet'
British Moth, 630, early 60's 'Pisces'
!!!! Not CVRDA !!!!
Comet Trio - something always ready to sail.