Hi, I'm trying to take off the rubrail from my boat as it needs to be cleaned out and refitted. However the screws (I presume it's screwed on?) are plugged with teak plugs. I've tried gouging them out and also inserting a screw into them, but I seem to be making a mess. I've tried 2 plugs now, and whist I've hit the head of a fixing, I can't be sure it's a screw as I can't make out the slot in the head. I can't seem to get enough plug out to see what's in there. Any thoughts?
Phill
Removing rubrail from Ent.
Removing rubrail from Ent.
Phill Burrows
Re: Removing rubrail from Ent.
Phil,
Bit of a nightmare this job, it may not be possible to remove it in good enough condition to refit it.
The Rubbing strips may be considored consumables.
Your going about it the right way, no other way to do it, drill out the plugs and then unscrew it. Good luck.
Kev
Bit of a nightmare this job, it may not be possible to remove it in good enough condition to refit it.
The Rubbing strips may be considored consumables.
Your going about it the right way, no other way to do it, drill out the plugs and then unscrew it. Good luck.
Kev
Re: Removing rubrail from Ent.
Cheers Kev, that's what I was worried about.
What do you think about a plug cutter type drill? Of I can't get it off in one piece do you think the best option is to make a new one? I'd rather just get the existing one off and clean it up, but I can't get at the bloody screws. Might they be rivets? If so is that easier, I just don't know... The only other option is to leave it on and fill the gap with epoxy but there's loads of brittle stuff behind the rub strip.
What do you think about a plug cutter type drill? Of I can't get it off in one piece do you think the best option is to make a new one? I'd rather just get the existing one off and clean it up, but I can't get at the bloody screws. Might they be rivets? If so is that easier, I just don't know... The only other option is to leave it on and fill the gap with epoxy but there's loads of brittle stuff behind the rub strip.
Phill Burrows
Re: Removing rubrail from Ent.
A plug cutter will make much more mess than a drill; they really only work in a drill press. I think it is unlikely, but just possible, they are copper nails not screws. When you have drilled out the plug chip around with a bradawl or similar to find and clean out the bits of glue from the slot of the screw(that's assuming the plug is glued in). However the chances are the rail may also be glued which will prevent you getting it off in one clean piece. If it is all glued and you decide to renew it the best way may be to saw down the sides of each plug/screw then chisel away to leave the screw clear and remove it. Extract with mole grips if all else fails.

Re: Removing rubrail from Ent.
All above makes sense.
Are you leaving the decks in place?
One other possible answer which I have seen done, although not done myself is to set up a router to take off the top half of the rubbing strip and just replace that. It is a much easier job as you have something to clamp the new 'top' to. If you choose the wood with care, it is all but impossible to notice afterwards, as you nearly always look down onto the decks. It uses up half the amount of wood. It is easiier to fit. the router can use the edge of the rubbing strip as a guide.
You may decide then to either route down to above the screws and not have to worry about remouval at all....or...
go carefully go down untill you just touch the screws and use the additional access to help remove them, or buy a cheap router bit and just go through them.
cheers
eib
Ed Bremner
CVRDA
Jollyboat J3
Firefly F2942
IC GBR314 ex S51 - 1970 Slurp
MR 638 - Please come and take it away
Phelps Scull
Bathurst Whiff - looking for someone to love it
CVRDA
Jollyboat J3
Firefly F2942
IC GBR314 ex S51 - 1970 Slurp
MR 638 - Please come and take it away
Phelps Scull
Bathurst Whiff - looking for someone to love it
Re: Removing rubrail from Ent.
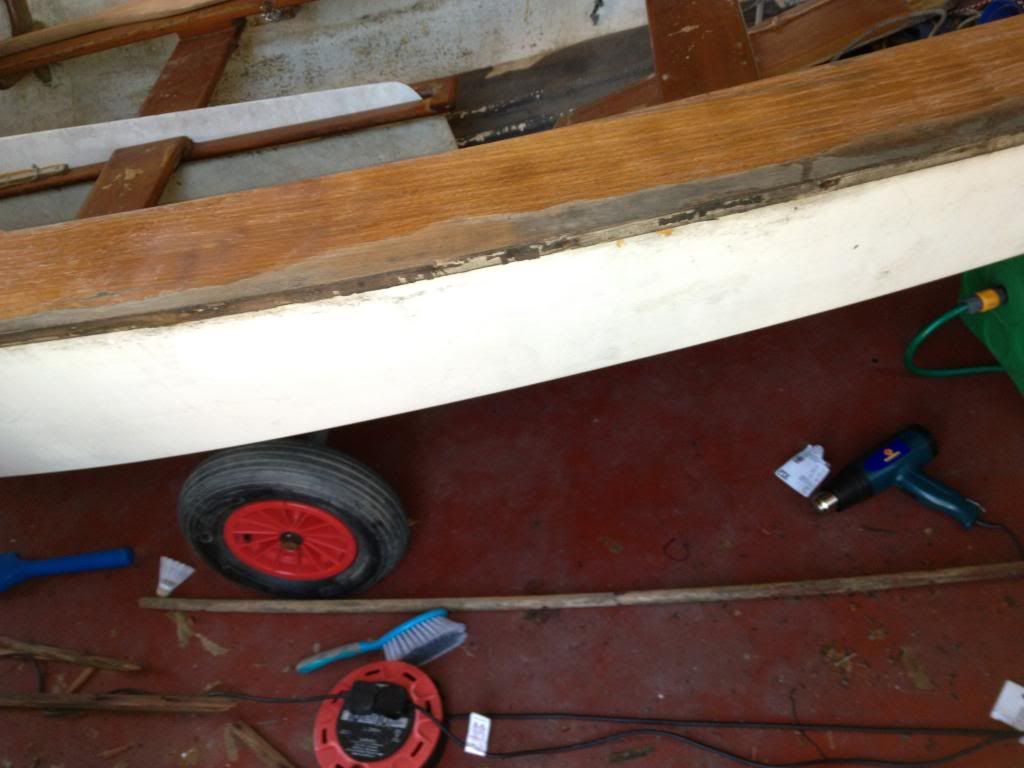
Hi. Well I've tried to remove the plugs and det hold of the fixings. It turns out that they were screwed but were terribly rusty, no way of screwing them out. So.... I've taken the whole rub rail off, it came off cleanly but is in lots of broken pieces.
I'ts good because I've cleaned away all of the old varnish and rubbish that was behind the rail, but now have to replace it. I'm a bit worried about this because I've no idea where to get a length of hard wood from with the correct profile or even how to refit it
Pic here that I took earlier today
I'ts good because I've cleaned away all of the old varnish and rubbish that was behind the rail, but now have to replace it. I'm a bit worried about this because I've no idea where to get a length of hard wood from with the correct profile or even how to refit it
Pic here that I took earlier today

Phill Burrows
Re: Removing rubrail from Ent.
Make it yourself. Mahogany the right thickness run it through the table saw and then half round it over with the router.
Re: Removing rubrail from Ent.
You may find mahogany difficult to source these days but other woods will be just as good. Iroko will last very well but is not quite so nice to work and is a more golden colour (difficult grain and the dust can choke so use a mask). Beech and sycamore are both quite cheap but rot easily in marine use so I would avoid those. Sapele and Utile are fair alternatives to mahogany and fairly common. same colour.
If you don't have routers or machine tools yourself don't worry: most timber yards will machine at a cost so ask them to prepare to a square or rectangular cross section that will allow you to get the finished shape. Ask for it to be planed and thicknessed to your finished dimensions, stress these are your finished thicknesses. (25mm planed timber comes out at 20mm finished as they start with stuff sawn at 25mm).
Then fit it to the hull and use a hand plane to shape it afterwards. Going down the grade from course to fine sandpaper round a cork block will get the shape smooth.
If you are worried about bending it to the hull profile you could do it in two thicknesses and glue the first layer on but just screw the outer layer on. This can then be replaced easily in the future with out disturbing the inner piece.
Re: Removing rubrail from Ent.
Hi chris. Thanks for an excellent reply. Some good pointers there. I went to a timber yard who just happened to have a few 16ft lengths of Sapele so I'll go for that. They are able to create a half round profile with an existing tool which seems ok to me for a cost of £24 per side. The wooden rail that I removed was not a true half round as there was an allowance for the angle of the hull on the lower edge of the rail.
I quite like your idea about 2 strips but as they will cut and shape it for me, I guess I'll have to get it on in one. I'll do a bit of research on steaming and bending wood before I do this.
Anyway, got quite a bit of preparation to do before I get to this stage.
Many thanks
Phill
I quite like your idea about 2 strips but as they will cut and shape it for me, I guess I'll have to get it on in one. I'll do a bit of research on steaming and bending wood before I do this.
Anyway, got quite a bit of preparation to do before I get to this stage.
Many thanks
Phill
Phill Burrows
Re: Removing rubrail from Ent.
From what I remember when I restored gannet and a number of boats needing re-decked if you start from the stern of the boat with holes predrilled every 6-8" and gradually pull the strip inwards using clamps and a rope at the bow end with the epoxy in place the whole thing will go together without the need for steaming. It's a good idea to use a rope to pull the bow end inwards as you go along so that you don't have all the strain pulling on the last screw you put in especially where the curve is greatest. Towards the bow the line straightens again and the strain becomes less. A good tip is to use wooden battens to avoid the clamps damaging the wood but back these with the brown plasticky parcel tape - epoxy won't stick to the shiny side. When you have finished wipe off any excess and when hardened I find that any hefty further excess can be removed by the judicial use of a hot chisel before getting a plane and sandpaper at it for profiling. Take care with the plane not to overdo the shaping and risk cutting into the ply on the decks. A router would work too but in unskilled hands this can be a vicious and rather unforgiving tool!!
-
Jimmylovescake
- Posts: 61
- Joined: Mon Sep 30, 2013 6:34 pm
- Location: North Devon
Re: Removing rubrail from Ent.
I'm new to boating and restoration, and have just started stripping back an old plywood Enterprise to uncover what is mostly good wood but some areas that will need patching or replacing. I foresee me going through many of the same experiences discussed on the forum posts here including this one (when I come to replace the deck ply)
In surfboard shaping there's a tool that is called a "Fred" that serves as an aid to shape the rails of the board:-
http://www.foamez.com/fred-tool-p-163.html
Would this be suitable for the job of reshaping the top edge of a rubrail?
Also, How essential is it that the Rubrail is a perfect halfround on the lower edge?
Thanks
Jimmy
Re: Removing rubrail from Ent.
Unless class rules come into it (and its always worth checking class rules, there can be some odd stuff) the shape is pretty much down to you. Personally I tend to favour a less rounded profile on my boats, since they are typically picked up and carried from time to time, so the less likely fingers are to slip off the happier I am. I don't really get your fred tool, maybe I'd have to see it in action, but it seems to be based on a surform blade, which I usually find a bit brutal for finishing, even at my somewhat agricultural level of boat repairing.Jimmylovescake wrote:Also, How essential is it that the Rubrail is a perfect halfround on the lower edge?
-
Dare Barry
- Posts: 16
- Joined: Wed Aug 29, 2012 12:17 pm
Re: Removing rubrail from Ent.
Talk to Robbins in Bristol, they will produce the timber you require ,cut to length and profile you require. Get a plug cutter and away you go.
Best of luck Dare Barry N1002
Best of luck Dare Barry N1002
Re: Removing rubrail from Ent.
I would always put the guwhale on the boat unshaped and then shape it in place with a plane. It is an easy, fun and rewarding job. you can even change the shape as it goes down the boat....soft under hiking areas and hard under carrying bits.
Doing it in two sections as Chris recommends works well and makes subsequent work much easier
As does Garry's of pinning it and moving on to the next.
My preference is to clamp it one end and slowly over a few weeks, pull it into place (with rope or elastic) so that it slowly and easily takes up the correct bend, without any tight spots. You can help it by wrapping wet rag around it and applying some steam every now and again.
Once it is the right shape, stick it on (with as few screws as possible, even none if possible). Screws in epoxy tend to be a nightmare to remove at a later date. If you find you have to use them, consider taking them out as soon as the glue is strong enough to hold without them.
the issue I have had with forcing gunwhales into place and using epoxy is that (presuming a good accurate fit) the glue can be totally forced out of the joint and you end up with next to no glue in the joint and a very weak join. this might not be such a problem with Resorcynol or glues that prefer a tight fit, but not epoxy.
only other thought is don't underestimate the additional length that you need to allow for the curve of the boat. the boat might be 14' but the length of the gunwhale will be quite a bit more than you might imagine.
go for it.
fun job
only problem is finding the wood, and if you have done that, you are home dry.
cheers
eib
Ed Bremner
CVRDA
Jollyboat J3
Firefly F2942
IC GBR314 ex S51 - 1970 Slurp
MR 638 - Please come and take it away
Phelps Scull
Bathurst Whiff - looking for someone to love it
CVRDA
Jollyboat J3
Firefly F2942
IC GBR314 ex S51 - 1970 Slurp
MR 638 - Please come and take it away
Phelps Scull
Bathurst Whiff - looking for someone to love it