Some thoughts.
I put all the ply in the steam tent dry. It may have been better to wet it first. The wood didn't get really flexible until some hours in the tent, at which time it was mostly wet from condensation. No easy way of telling whether it was the hours or the wet.
I think it would have been better to do this in stages if time permitted. There's a definite catch 22 in that you want the wood to be exactly to size before you steam it and put it in place, but in order to get it to size it must be steamed. It would be better to do alternate pieces in separate passes as Andy Bloodaxe suggested for the strips.
The wallpaper stripper seemed to generate plenty of steam, but not sure if it was really hot enough in my tent. Should have spent more time making it better insulated. I think by the time the steam has passed down the pipe into the tent it has cooled appreciably, I should have lagged the pipe. A custom installation would be much better quelle surprise.
You want as many straps and battens as possible for holding ply onto the mould. Staples don't grip that well in a soggy environment.
Don't try and be too clever. This is an awkward job because the skins are butting onto the old hull. Rather like putting on new deck Ply with the old gunwales in place which I always advise against for people at my low level of craftsmanship.
Maybe more thoughts later.
Some pics on the Flickr link above.
UnSkol gets a newbottom...
Re: UnSkol gets a newbottom...
Last edited by JimC on Sat Nov 08, 2014 12:34 pm, edited 1 time in total.
Re: UnSkol gets a newbottom...
Burning the midnght or should I say early morning oil there Jim?
Hornet 191 Shoestring,
Hornet 595 Demon awaiting restoration
Hornet 610 Final Fling
Hornet 353
Hornet 595 Demon awaiting restoration
Hornet 610 Final Fling
Hornet 353
Re: UnSkol gets a newbottom...
early morning. I was so tired after the day in the steam I retired at 8!roger wrote: early morning oil there Jim?
Re: UnSkol gets a newbottom...
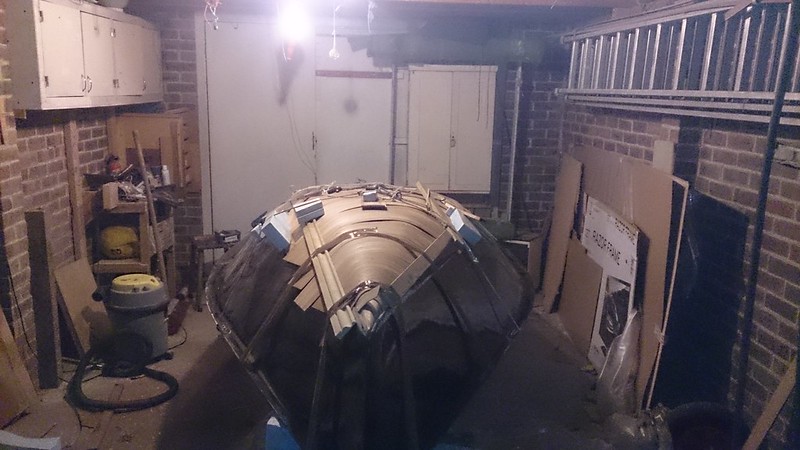
Because the panels aren't exactly to shape yet it wasn't possible to get them to sit exactly flat as is more than obvious...
I'm hoping that they will be near enough that it won't be too hard to get them to sit down cleanly without further steaming. If they won't sit down well then that will be irritating, well, I'll have to shape them exactly, then resteam them to get a precise fit. Of course what you can't do is to cut them exactly to size before steaming them, because at that stage they won't bend enough to be able to shape them. Ho hum.
Certainly learning a lot doing this build, its really a couple of levels above my skill set, but that was part of the aim. If you're not learning then... Still, if the worst comes to the worst I could always rip the lot off and do 3 separate chines in 4mm ply...
Re: UnSkol gets a newbottom...
Some more work this week. Started gluing some panels in place.
Firstly here's an idea. I grabbed some heavy duty plastic packing strip from the skip at the builders merchants. The idea was to staple through it to make staples easier to remove, but its proved a bit heavy for that. However its great from packing under cramps to reduce bruising and also used it to provide guides to locate pieces repeatably. Pencil marks don't work that well when covered in epoxy bog...
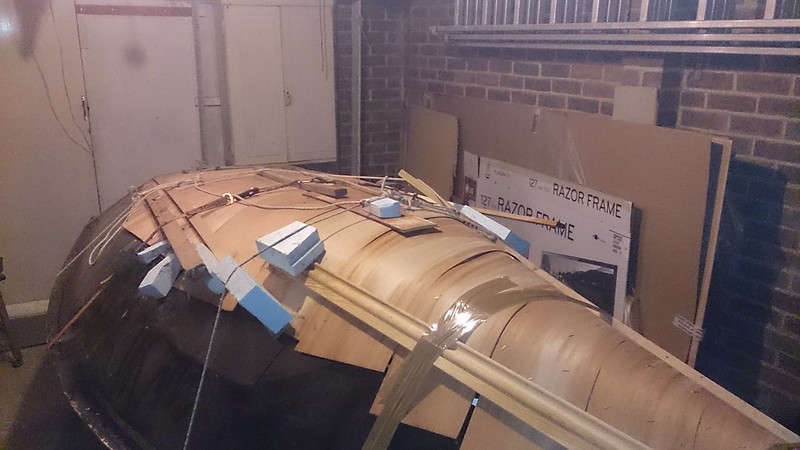
Now here are a couple of shots that show how much curve I managed to get in the panels. Just about enough, but the steam bath definitely needed to be hotter. The wall paper steamer was a reasonable idea, but probably not man enough. Maybe I needed a source of secondary heat to get the interior of the steam chamber really hot.
The odd modified screwdriver in the above - this is something that Andy Paterson put me onto. Its a staple remover. Take an old cheese head screwdriver and heat it up (a calor gas ring was hot enough to get near red hot) and bend to the swan neck shape, then quench. Finally sharpen the screwdriver head to about blunt chisel level and you have a tool that you can readily slide under staples and lever them up. Add a pad under the bend and you minimise the amount of damage from staple removal. Staple down through an appropriate plastic tape and damage to the wood should be minimal other than staple holes.
There are a lot of lessons I'm learning about how to do this stuff.
Getting the pieces on would be shed loads easier with an assistant so one can have clean dry hands while the others are epoxy sticky.
I was hoping that fewer larger panels of ply, and only two layers in the less curved aft sections would save work, but I'm not at all sure that I wouldn't have been better off just doing the whole thing in 3 layers of veneer.
Gluing a wood bottom on a glass boat is just a bad idea... You leave yourself having to shape each radically curved panel to fractions of a millimetre. I said before I always advise people not to fit decks between existing gunwhales. This was ten times worse... More in a minute..
Firstly here's an idea. I grabbed some heavy duty plastic packing strip from the skip at the builders merchants. The idea was to staple through it to make staples easier to remove, but its proved a bit heavy for that. However its great from packing under cramps to reduce bruising and also used it to provide guides to locate pieces repeatably. Pencil marks don't work that well when covered in epoxy bog...
Getting the pieces on would be shed loads easier with an assistant so one can have clean dry hands while the others are epoxy sticky.
I was hoping that fewer larger panels of ply, and only two layers in the less curved aft sections would save work, but I'm not at all sure that I wouldn't have been better off just doing the whole thing in 3 layers of veneer.
Gluing a wood bottom on a glass boat is just a bad idea... You leave yourself having to shape each radically curved panel to fractions of a millimetre. I said before I always advise people not to fit decks between existing gunwhales. This was ten times worse... More in a minute..
Last edited by JimC on Sat Nov 08, 2014 1:23 pm, edited 1 time in total.
Re: UnSkol gets a newbottom...
And here comes a result of getting it wrong...
Each panel was shaped and measured after being clamped down firmly on its stringer, so it ought to be possible to get it down within a mil or two, even bearing in mind the extreme curvature.
But I goofed... The floor each side of the centreline is extremely flat in this area, and the natural lie of the ply was a double curve with a hollow along the centreline. I didn't see this until gluing down, so got a piece of 6mm ply and clamped that down on top to make it flat, and all was OK - I thought.
Until I took it all off, and discovered that there hadn't been enough play to absorb that tiny bit of movement at one end of the piece, and it was sitting up above the stringer. I couldn't face ripping it off, likely destroying it and having to steam a new piece all over again. So I sliced a wedge shaped piece out of the play, and glued it down again with a patch underneath to cover the butt joint.
This is the shape I should roughly end up with: this is the bottom layer of steamed ply stapled down having dried off. This is earlier than the other photos in this section.
Current status is that I have about half the pieces and two thirds of the area bottom skin glued down. The upper skin will be next. Going to be a real pain to consolidate that. I suppose it really should be vac bagged. In the bow area there will be a third skin. Going to have to do some careful stuff with a router where the two layers of 3mm and 3 layer of 2mm transition.
More photos and larger sizes on flickr here... https://www.flickr.com/gp/56735928@N05/6995Td
Each panel was shaped and measured after being clamped down firmly on its stringer, so it ought to be possible to get it down within a mil or two, even bearing in mind the extreme curvature.
Until I took it all off, and discovered that there hadn't been enough play to absorb that tiny bit of movement at one end of the piece, and it was sitting up above the stringer. I couldn't face ripping it off, likely destroying it and having to steam a new piece all over again. So I sliced a wedge shaped piece out of the play, and glued it down again with a patch underneath to cover the butt joint.
More photos and larger sizes on flickr here... https://www.flickr.com/gp/56735928@N05/6995Td
Re: UnSkol gets a newbottom...
I've got all the first skin down now, and am getting on with fairing it and tidying up all the edges and the like, plus working out what to do about various infelicities.
I was planning on using a router to do a lot of the tidying up for the next layer, overlaps between layers of ply etc but the old one that is all I have available is a surprisingly tricky tool to use on highly curved surfaces . Even the best jig I could think up was defeated by some of the curves. I need to put some rabbets in near the bow where its transitioning from 2 * 3mm to 3*2mm, and it actually looks as if its going to be easier for me to do them by hand rather than use the power tool.
Tool of the morning is my graduated set of "long boards", just lengths of plank with a handle and sandpaper stapled to them. The first layer of ply definitely didn't sit down as well as it might have, so much longboarding... I think I shall divide each panel in two for the top layer to make it easier to trim and staple down, plus handle the 3 dimensions better.
I needed to steam a bit more ply for the bow area in tight curves.Thought I'd try something different so I've just bent the ply round a bottle as per example in other thread which will hopefully bring it within stapling distance of what's required. Boiled water in an electric frying pan and soaked the wood in that, then bent it round the bottle. Couldn't find a suitable empty bottle, so I had to drink up the end of a bottle of 10 year old Glemorangie single malt in order to get a bottle freed up. Its a tough job, but someone has to do it...
Re: UnSkol gets a newbottom...
Here's another progress shot. Easier to get photos from odd angles with a phone than an SLR. Astonishing really that a mere mobile phone can be adequate for this sort of picture.

I've decided I'm going to have to vacuum bag the last skin on. I'm not happy with the results of the middle skin using staples. So I suppose I'm going to have to buy a vacuum pump. Groan. Any suggestions? Doubtless it will have to do carbon laminates as well as wood...
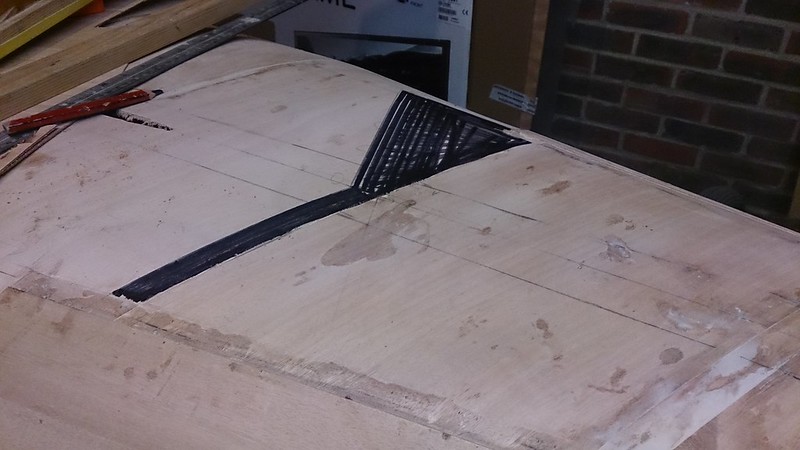
here's an idea that worked. I have a router, which is potentially useful for getting the thickness down where it needs to, but I find it horribly difficult to position accurately. So I marker penned the area I needed to take down black, and it was much easier to be sure that I was cutting in the right place.
More pics and the mandatory link back to flickr here...
https://www.flickr.com/gp/56735928@N05/6995Td
I've decided I'm going to have to vacuum bag the last skin on. I'm not happy with the results of the middle skin using staples. So I suppose I'm going to have to buy a vacuum pump. Groan. Any suggestions? Doubtless it will have to do carbon laminates as well as wood...
here's an idea that worked. I have a router, which is potentially useful for getting the thickness down where it needs to, but I find it horribly difficult to position accurately. So I marker penned the area I needed to take down black, and it was much easier to be sure that I was cutting in the right place.
More pics and the mandatory link back to flickr here...
https://www.flickr.com/gp/56735928@N05/6995Td

Re: UnSkol gets a newbottom...
Vacuum pump is easy as long as you are happy to build it yourself.
All you need is a fridge/freezer compressor, a vacuum gauge which costs a few quid on ebay, some pipe and some form of switch or way of regulating the pressure.
I used to use a small fridge compressor, but then found a large can-drink dispensor cooler which was twice the size and really most probably overkill.
To be honest I don't think you need the gauge, or for that matter a switch, although both are useful. I just have an end of the vacuum tube going through a plate steel g-clamp, which makes it easy to gradually throttle the tube. You set it all up let it suck down and then adjust the inevitable leaks and the g-clamp till you get a steady amount of pressure.
There used to be some very good diy stuff on build your own vacuum pumps when searching for 'little sucker' or 'lil sucker'.
http://www.diy-boats.com/wp-content/upl ... m_Pump.pdf
http://www.berkut13.com/sucker.htm
These are not the ones I remember, which gave a clever design for making a vacuum switch from the auto-advance thingy on an old BMC type dizzy. But as I said, you don't need it, the system suggested here works fine for me.
Incidentally, I was told all this by Wiz Deas, who pointed me in this direction and I have never looked back.
The skill to vacuuming is working out how to use the bags and remember the basic rule: No Voids!! Just remember the pressure that can be exerted is quite a bit and I have had some exciting implosive moments, when I have played loose with the No Voids rule.
Good luck, if you havn't done it, you will simply be amazed by how easy it is to do and wonder why so few people do it.
cheers
eib
Ed Bremner
CVRDA
Jollyboat J3
Firefly F2942
IC GBR314 ex S51 - 1970 Slurp
MR 638 - Please come and take it away
Phelps Scull
Bathurst Whiff - looking for someone to love it
CVRDA
Jollyboat J3
Firefly F2942
IC GBR314 ex S51 - 1970 Slurp
MR 638 - Please come and take it away
Phelps Scull
Bathurst Whiff - looking for someone to love it
Re: UnSkol gets a newbottom...
I have a commercial 'airpress' heavy (ish) duty one. if you can collect from Frome you could borrow it, but I do need it back!
Chris
Chris
Re: UnSkol gets a newbottom...
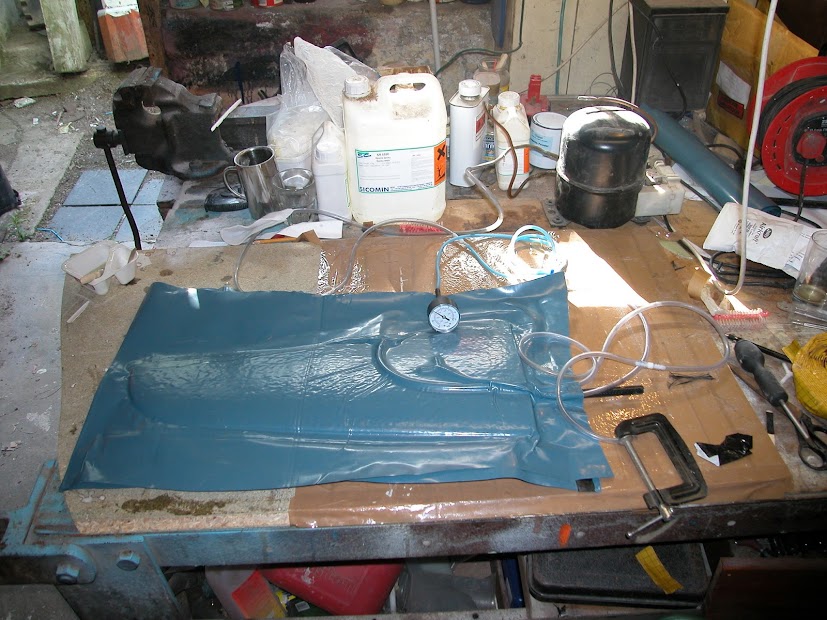
Tried to find a good image of my vacuum set up in action.
I am sure I have better, but this will give you the idea of how simply it can be done:
A few more at: https://plus.google.com/photos/11373149 ... 0sr7wMDdYA
but you will have to flick through rather a lot of boring shots of cutting the decks off my IC first.
cheers
eib
ps you can if you wish point out the basic vacuuming mistake in this shot....I got away with it this time...but wasn't so lucky when I used the same set up for another foil I did.
Ed Bremner
CVRDA
Jollyboat J3
Firefly F2942
IC GBR314 ex S51 - 1970 Slurp
MR 638 - Please come and take it away
Phelps Scull
Bathurst Whiff - looking for someone to love it
CVRDA
Jollyboat J3
Firefly F2942
IC GBR314 ex S51 - 1970 Slurp
MR 638 - Please come and take it away
Phelps Scull
Bathurst Whiff - looking for someone to love it
Re: UnSkol gets a newbottom...
Just discovered at least one sheet of my 3mm ply was nearer 3.5mm. That's confused all my sums on thicknesses!
Re: UnSkol gets a newbottom...
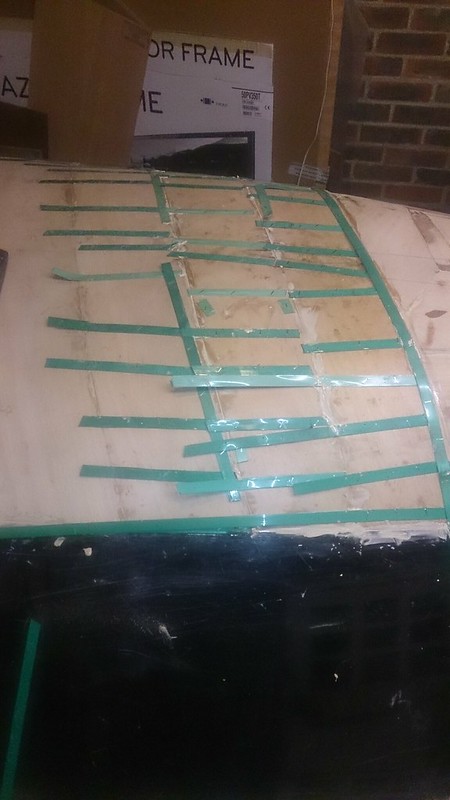
Well, I've got some outer skin on. More next time I can get down there to work on the boat. I've been using packing tape under the staples to ptoytect the ply, seems to work well so far.
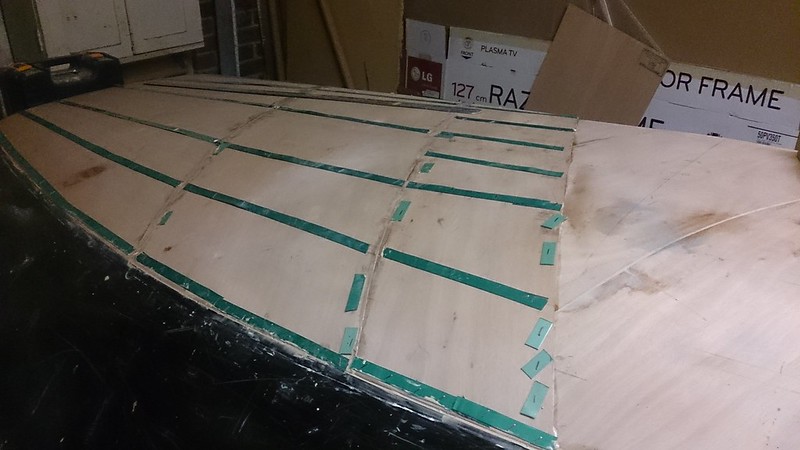
Green packing tape strips are protecting ply from staples.
Green packing tape strips are protecting ply from staples.
Re: UnSkol gets a newbottom...
Going to have to scrounge some more of that packing tape... Many thanks to Travis Perkins, Shipton Green, Itchenor for letting me raid their skip for the stuff.
Last edited by JimC on Sat Dec 13, 2014 10:45 pm, edited 2 times in total.
Re: UnSkol gets a newbottom...
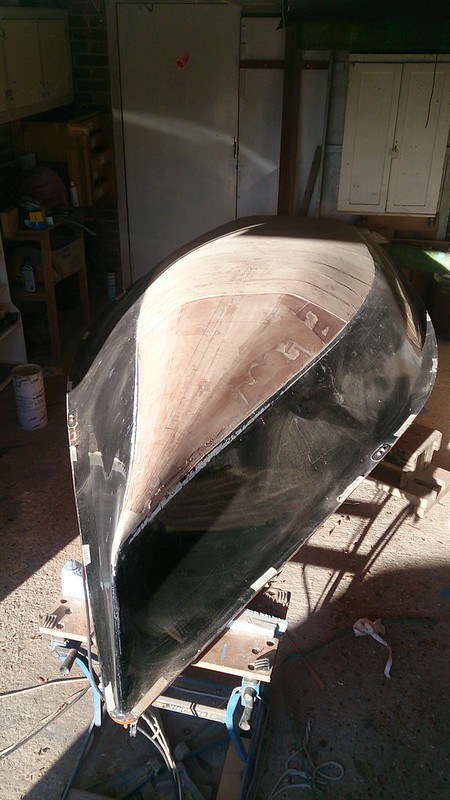
Getting there. All the 3mm ply skins are now glued down, just the 2mm sections near the bow to do. On reflection maybe I should have done the whole boat in 3 * 2mm play rather tham mixing 2mm and 3mm, although as well as the expensive ply it would have been a lot more glue. Maybe OK if bagged...
Also its worth thinking very hard about your shape before making decisions on how wide the panels should be etc. Basically I have panels getting narrower towards the bow, and thinner ply in the bow area assuming that would be the most challenging but I think in practice its more complicated than that. The real nightmare area is the bit I've just done, where's there's a firm turn of bilge and a fair bit of curve in the waterlines. Its very 3 dimensional here, and there's going to be a *lot* of fairing to do. By contrast nearer the bow, although there's a lot of curvature, its pretty two dimensional and it seems as if its going to be much easier to get the ply to sit properly.
On that subject, here's a question. I have a bad feeling that when I fair the boat at the end I am going to go through the top layer of ply in a couple of places. This makes me nervous, never liked exposed end grain on plywood boats, and an exposed feather seems like trouble to me. Does the panel think that when I've done the fairing if I do end up with some patches like that I should take them down a bit and put a patch on so that the end grain isn't exposed?
Another lesson I've learned is the importance of accurately locating the panels. Its very easy for one to get just out of alignment as the staples go in and then you can end up with some wide gaps - visible in some shots on the photostream - or even worse needing to be retrimmed, but now they are covered with glue. Need a very accurate way of locating the panels as they go down. Andy P suggested I do every other strip, and only shape the alternates accurately to fit, and that would also help locate the intermediate pieces very accurately. With practice, BTW, its suprising how little work it is shaping each successive panel to meet the previous. I would certainly recommend anyone doing this to err on the side have having too many narrow strips rather than too few wide ones...
All the photos are here, some more embarassing in displaying lack of skill than those I've highlighted. If I were to rip all the skin off and start again I could do a much better job, but then it was always intended to be a learning exercise. As you'll have gathered I elected not to go for var bagging in the end, I decided I would need to learn from watching someone who knows what they are doing.