Tony’s story of his N18 project.
Having sold my Soling and being left with just a catamaran, which to put it bluntly I was too fat and unfit to sail without making myself ill so it hasn’t been used for a couple of years – I found myself missing going on the water in a boat.
When Ted [at Helen’s prompting] offered me the tatty old N18 in the field for a ‘small consideration’, I decided it was a worthwhile project and said yes.

How we found the boat. Looks ok. She wasn’t.
Getting it back from Oxford was an epic in itself since sourcing a trailer at a reasonable price proved well nigh impossible and I ended up re-vamping the old catamaran trailer I never used. New wheels, new suspension, new rollers and a new spine later I essentially had a new trailer, which I hoped would be man enough to do the job required [it was]
Once the inevitable problems with the lighting board were sorted out I was ready to go, and one weekend in 2008 I set out on the 200 mile drive to fetch the boat, on a day notable for its storminess even for that washout summer. All around rivers were in flood and spray and rain were everywhere. The words ‘is your journey really necessary’ kept on coming back at me as the empty trailer bounced along behind the car. Keeping to the motorway I made reasonable time considering the conditions and arrived to find Ted already working on getting the boat off the trailer.
Now the situation as was is that the boat weighing some 250 kg sat on a massively heavy launching trailer which in turn sat upon an equally heavy bilge keel trailer. The question now was how we could get the boat off this rig and onto my much lighter set up. Ted wanted to sort of get it back to a balance point and then sort of waggle it onto my trailer and then sort of slew it round to fit, so for a while this is what we did. It wasn’t long before we realised that this wasn’t going to work and that a plan B was required. Eventually we did what I had envisaged our doing all along; we dropped the boat off the back and onto the grass, with the bow propped up on logs and my trailer in front. Suitably blocked, wedged, braced and stropped back to my car the trailer was as solid as we could make it and with Ted’s 4×4 pulling the boat it rolled up and on.
It didn’t actually fit that well, but we chocked and braced anew until it was on ok and not liable to drop off anywhere between Oxford and Wales.
All this had taken a couple of hours so when the rain started falling again we retreated to the house for tea and toast. It was agreed that since the weather was still abysmal, and that better was promised for the next day, it would be best to stay overnight; a much more sensible idea than my go-for-it return that same day.

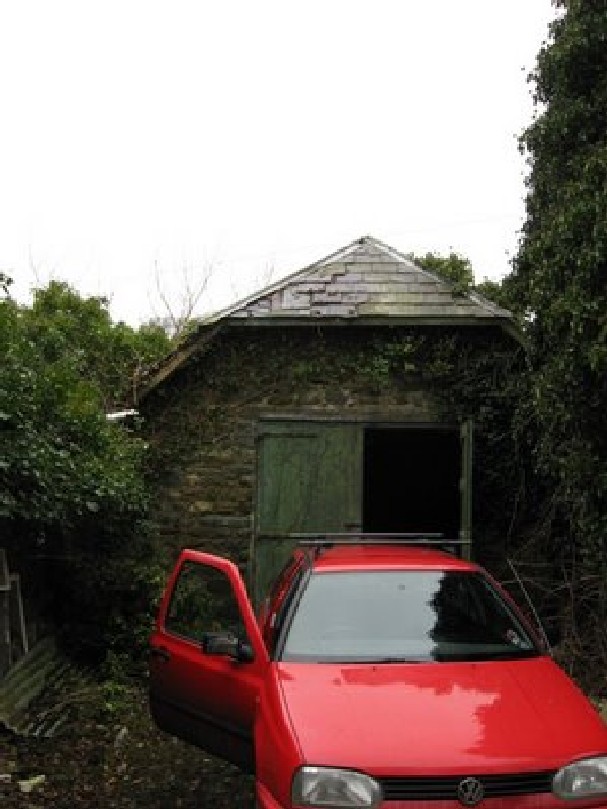
The boat all set to travel back to Wales. Just need to strap it down, and find somewhere to put 30’ of mast
Next morning dawned reasonably clear and dry, so after a hasty breakfast I was off. I stopped twice during the first ten miles, in order to check the tyre pressures and to make adjustments to the load. Six hours 230 miles and a largely uneventful journey later I had the boat tucked up at home, with the solid aluminium centreplate locked away.
The next day I started on the task of clearing out all the muck and rubbish from inside the cockpit, whilst trying to salvage what I could. Now, where was that wrecking bar?
The main problem was that whoever had last done any major work on the boat had used ordinary ply, which is fine if a] it is maintained properly and b] all the edges are well sealed. Unfortunately neither of these applied and the glue bonding the layers together had dissolved away turning the once tough ply into the texture of a digestive biscuit, and a soggy one at that. I literally had to shovel out the contents of the cockpit floor- it was more like gardening than woodwork.

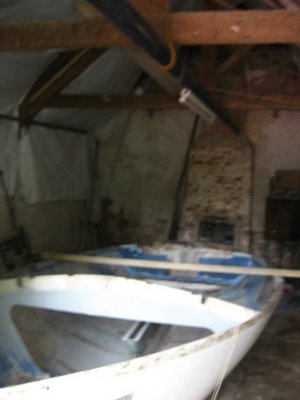
Argh! Mulch and rot aplenty
At least the decks seemed to be ok – so far as I could ascertain but I was prepared for more nasty news as I delved further and ripped out more manky rotten wood. Three hours later the enormity of the task ahead became more obvious. The ply had turned to weetabix; ditto the bearers holding it up, the centreboard cheeks, and the carlins. The deck ply was ok, but everything holding it up wasn’t. Once all that was removed, it was the turn of the outer and inner gunnels that although not rotten, were suspect enough to warrant replacement.
So, not only did the cockpit floor need replacing but so did all the bearers, the wood around the centreboard casing, the cockpit coaming and the all the woodwork around the mast area and also the fore and side decks.
A load of badly fitted buoyancy was ripped out as well as some weird bits and bobs. I have no idea what significance they had, but they were gone. The more I looked at it the more I thought that trying to ‘make good’ just about anything except the hull shell was a non starter.
So what I had left was essentially the glass fibre shell. Time for a radical rethink about what I wanted to do. I had been thinking about a conversion that appeared in Classic Boat some years previously and I liked the idea then. Well now I had the boat and the requirement to rebuild. The solution was obvious. I’d take an old very heavy dinghy out of class and make the conversion to something a little different.

Sibrwd gutted.
I carted her home where she sat on the trailer for the next couple of months whilst I made numerous attempts to grind away all the loose and suspect glass fibre inside her.
Whilst this was happening I was also vainly looking for a suitable building to use as a workshop, so she could dried out and worked upon in somewhat more comfy surroundings than the parking area opposite the house. After a couple of weeks of looking, I stumbled upon a building barely a mile from where I lived, in a place I had long known about but had completely overlooked.
The Garage
There was room aplenty at the new site – an old stable/garage attached to the outbuildings of a large house, now a restaurant. The range was still owned by the original family and although in a state of some disrepair would do nicely. The rent at a mere £10 a week swung it. I spent that Christmas clearing the ivy off the roof and trying to push some of the looser slates back into place. Then I lined the interior with the tarp that was covering the boat; tacking it to the principal rafters with battens. This would ensure that any rain getting in would run down the tarp and then the stone walls, not that much would. Once summer arrived I could do a better job of it. [I never did]. The place was a bit damp, a brick floor ensured that and there was no electrics, but I had a generator.
The boat was duly installed, sliding of the trailer and onto wooden bearers without much bother. Now I could start work in earnest; grinding back the nasties being the first job, followed by prepping the floors and cockpit sole, turning the boat over using the already installed Large Piece of Timber up above to attach my block and tackle to. I fired up the generator and prepared to do battle, only for it to die some minutes later. The engine was running lovely like, it just wasn’t pumping out any juice. So it was off to the repairers and I hired one in for the week-end.
Sibrwd ensconsed, ready to start
I had been quietly amassing the timber needed for the rebuild and seemed to have most of what I required for the first part. Now I had to go and be nice to an old guy who had a nearby timber yard and sawmill.
The rebuild brief was simple: put in a new cockpit sole on new floors, seal the edges to make a watertight compartment so that in the event of a capsize the boat won’t sink – easier said than done I suspect given the ease by which water can get into things – especially boat shaped things. For years I was pumping out rainwater from the Soling, and wondering where it all got in. I eventually traced it to a tiny screw hole in the deck that hadn’t been sealed properly.
Once the sole was down and the gunnels, inside and out were renewed I could start on re-building the deck: again this is reasonably straightforward on paper, or would be if I had plans. No, I had to do it ‘by eye’ where things would sort of *hang* where I wanted them to be, whilst I made up bearers and wedges and whatnot to make them permanent.
I decided that an all out, one-hit rebuild wasn’t on.
The realisation that given that the time available to me wasn’t going to be enough to get the job done before the end of the summer, I might as well just take my time, do the job methodically and think things through before applying saw to wood or even glue to hull. As someone once said; ‘measure once, curse twice’.
So from getting the boat undercover the previous winter, I had spent my time acquiring wood, sawing it, measuring up, buying epoxy and sealer, measuring more wood and ply and just generally feeling my way forward, essential when you have few plans to go by and have to make it up as you go along.
The input from the N18 Association was invaluable.
Mick Kneale over in the Isle of Man gave a load of valuable advice as to how to go ahead with the rebuild, sending me a photo cd of a rebuild he had recently completed as well as a copy of the original drawings for the ‘Surprise’ project I was loosely following. He wasn’t at all phased by the imminent loss of a N18 to the class, since the association was heading into lighter, faster, carbon tech territory with its newer boats.
I was going to follow the accepted norms for a N18 rebuild, raising the cockpit sole bedded on bulkheads , sealed to create 6 watertight compartments, no side tanks. And self draining through side mounted bailers in wells and via smallish drains to the rear of the boat. The cockpit sole would sit just above the static waterline. Epoxy fillets were used to bond wood to wood, but on advice from Mick, I would be using Sikaflex to bond the epoxy encapsulated floors to the hull.
So it was a bit of a milestone when the cockpit sole went in, glued and nailed down, edges sealed and sikaflex applied to make it nice and watertight. All the wood to grp edges were epoxy sealed and attached with sixaflex since epoxy, for all it’s superior qualities just does not bond well with old polyester grp. [polyester resin even less so].
The hatches were cut out and when the ordered stuff arrived I bonded them in with even more sikaflex. I was reasonably happy with the outcome; not perfect but ok, and to the cursory glance you would’nt know that the sole was ever so slightly twisted.
The build was somewhat heavier than Mick advised, since I wanted a cruising boat, not a racer, and given a lot of the time I would be singlehanded.

Cockpit sole going in 6mm ply epoxy sealed on 2”x1” Douglas Fir stringers on 9mm ply floors/ bulkheads. 2” x 1” DF inner and outer whales glued down and through screwed from the inside. The fibre glass bulkhead was the only internal structure, other than the centreplate box to survive the takedown
Next I built the bearers for the foredeck. These also had to withstand the lateral and fore and aft stresses of the steeply raked, unstayed hollow wooden mast, carrying a balanced lugsail, and positioned up in the eyes of the boat. I overbuilt the structure, using 9mmm ply, again epoxy sealed. The mast would sit in a hollow box extending from the keelson up to the deck. The box would also carry all the fittings for turning blocks.
Even so, I had left the area ahead of the centreplate box fairly heavily constructed in case I went to plan B and used a conventional Bermudan rig set up instead of what I had planned. In the end, it wasn’t needed.

‘space frame’ to carry the loads from the unstayed mast and support the foredeck

Another shot of the foredeck/mast support arrangement. The plastic tube was a trial fit to make sure I got the rake right. I did toy with glassing it to produce a cone, but went for a wooden box section instead
I’d tried to put it off until the next year, but it was something that has to be done and whenever it happens it’s going to cost money – quite a bit really.
I prevaricated about it and no matter how I cut the cake, there was no shortcuts, no utilising cheaper materials, or doing it myself. No I was going to have to spend and let an expert do the job.
So I gritted my teeth and went to see my local sailmaker and ordered a new engine for Sibrwd.
I already had an engine, two actually – a 3 hp Evinrude which although working isn’t a the best looking thing around, is heavyish and doesn’t really set her off at her best. I also have a 1.5hp seagull of uncertain vintage, but has bags of character and is just so for a modern trad boat like Sibrwd, even though it’s an ecological menace.
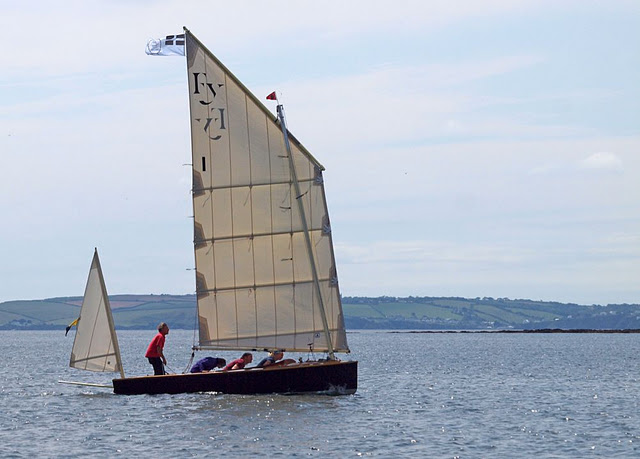
Surprise’s rig. Sibrwd’s will be pretty much identical.
No this was for the real engine in any sailing boat, the massive expanse of cream coloured cloth forming the lugsail – the main driving engine, the bit that makes it go, as silent as an albatross gliding over the sea in a zephyr with just the sound of the ripple from the cut of the bow in the water or the exhilarating hissssssss as she planes down the face of a wave on a broad reach.
This also had other implications, not just financial. Although I had gone down the route of having an unstayed lugsail rig in the eyes of the boat, I had also taken steps in the design to allow for a more conventional rig if everything else turned sour. Now it was too late. The deed was done. It was a lugsail for Sibrwd, nothing else
So over the next few months, in addition to finishing off the hull, sanding down and repainting the exterior, rebuilding the rudder and stock, I would have a 20’ mast to build, a 12’ mast to build, 8’ of bumkin to build and install and joy of joys 14’ of ultralight, ultrastiff carbonfibre yard to shape and glass up – all to hang a large hankerchief off.
The timber for the mast was here already 20’ of 5”x 4” Douglas fir to be sawn up into thin lengths for me to shape and glue back together.
Things were moving along slowly but surely. The cockpit sole was down all sealed and proper like, and the side deck framing was at last finished – just a couple more bearers to install. Of course like all boats, glass or not, there is a bit of asymmetry to the hull, nothing extreme, but enough to ensure that you need to measure both sides and not assume what fits one side will automatically do for the other.

cockpit coaming offered up prior to screw and glue. I know – not enough clamps! I put on a load more after this photo was taken.

The mast socket, up in the eyes of the boat.
The next bit was sanding back all those epoxy drips and smears, applying another coat of eposeal, installing the c/plate case top, painting everything that needed painting inside the boat, and then turning everything over so I could get to the underside.
I had intended to do this as the first job, but I thought that the shell was too flimsy to do that and decided to add some stiffness. I got sort of carried away and now have to possibly resort to ‘plan B’ careening her over far enough to do one side and the bottom and then shifting her the other way to do t’other side.

Clamping up the port side cockpit coaming. Yes I know – not enough of them
So here we are, the boat is coming along well, decks are on, cockpit coaming is on, ash gunnels ready to fabricate and put on, various bits of trim roughed out and ready to go, and lots of sandpaper ready to start sanding down the exterior of the hull preparatory to painting.
I had ummed and ahhed about whether to go for varnished or painted decks, in the end practicality won out and I used birch ply decking, sealed all round with eposeal which will then be painted with deck paint. The reasoning behind this is that the boat will sit on a mooring for most of the year and having so much brightwork to deal with would probably mean more time varnishing than sailing. Probably won’t look so nice though.
I used ash for the coaming and rubbing strake / toerail, a lack of the usual tropical hardwoods or similar in decent lengths dictated my course of action, plus I had some 20’ lengths of ash for a canoe project I never started, so it would be foolish to waste them. I could bang on about sourcing sustainably grown tropical hardwoods, but the truth is, any such thing is pretty much impossible to get in my neck of the woods [as it were] and locally grown hardwood is available, so I went with that. The ash was epoxy sealed and will be given many coats of varnish – what sort I am unsure, but it won’t be 2 pack.
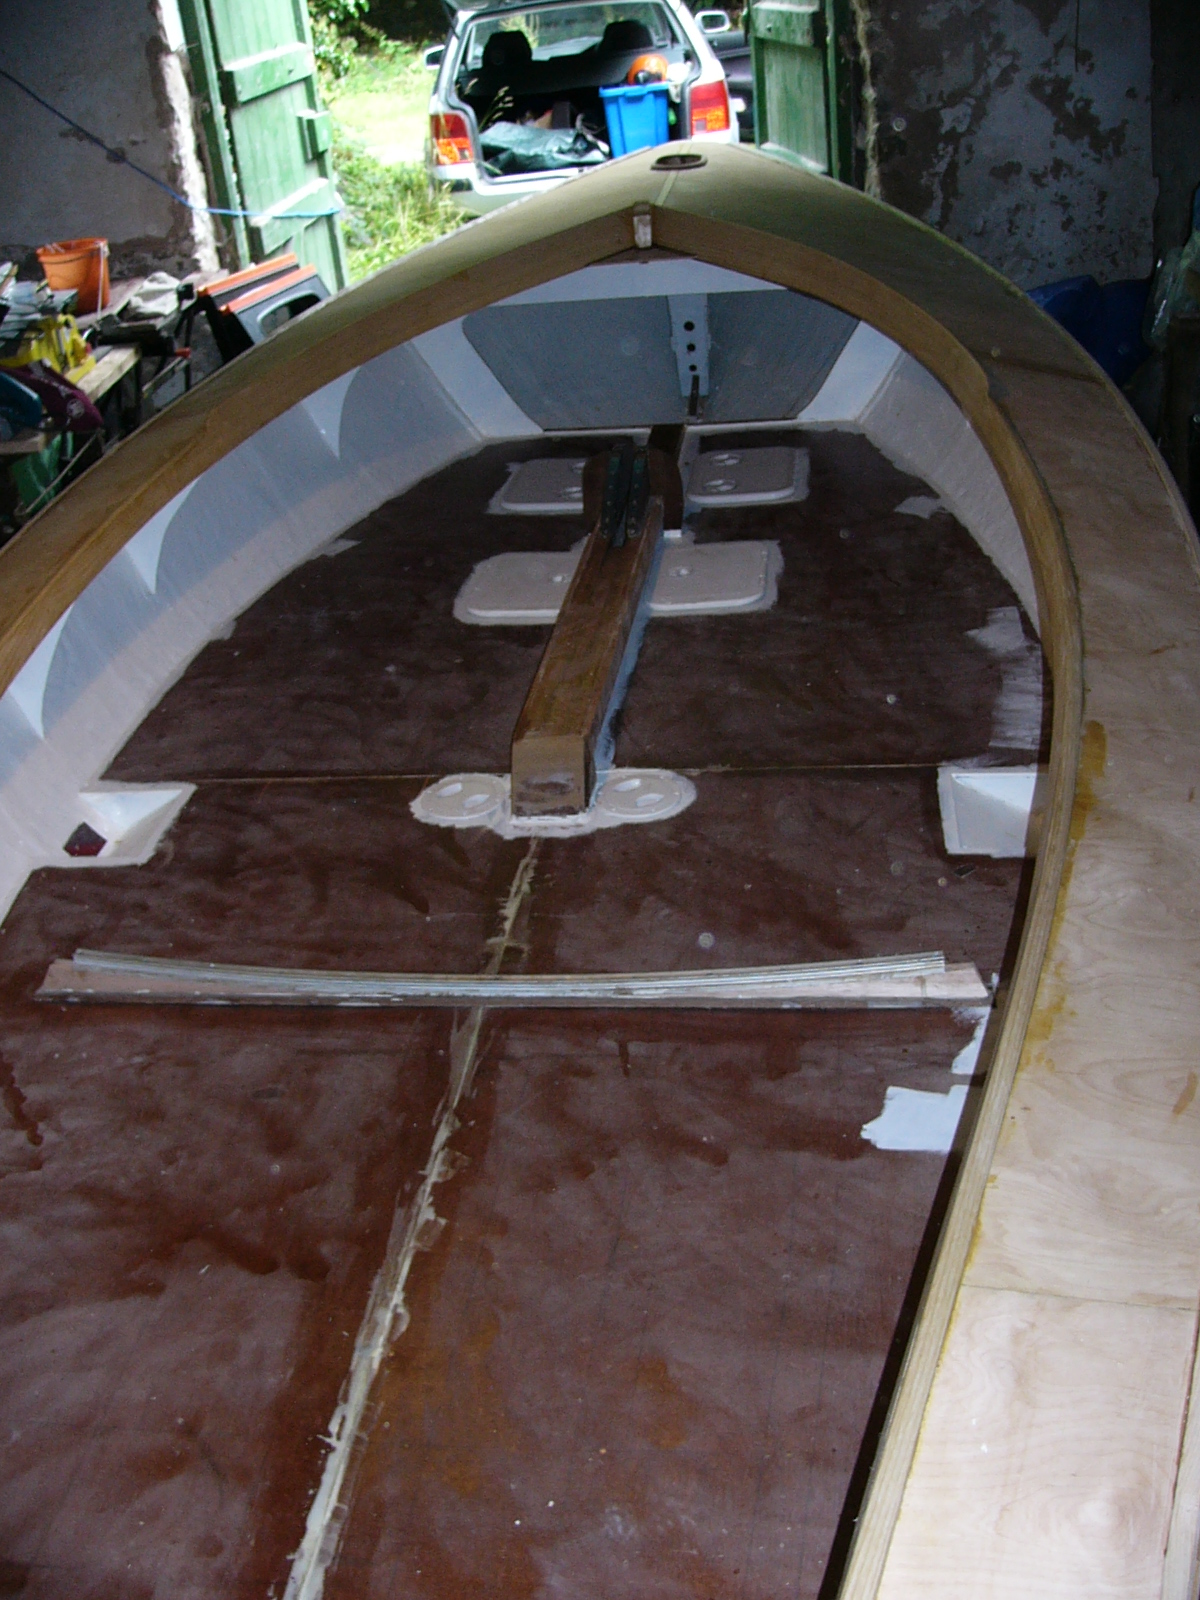
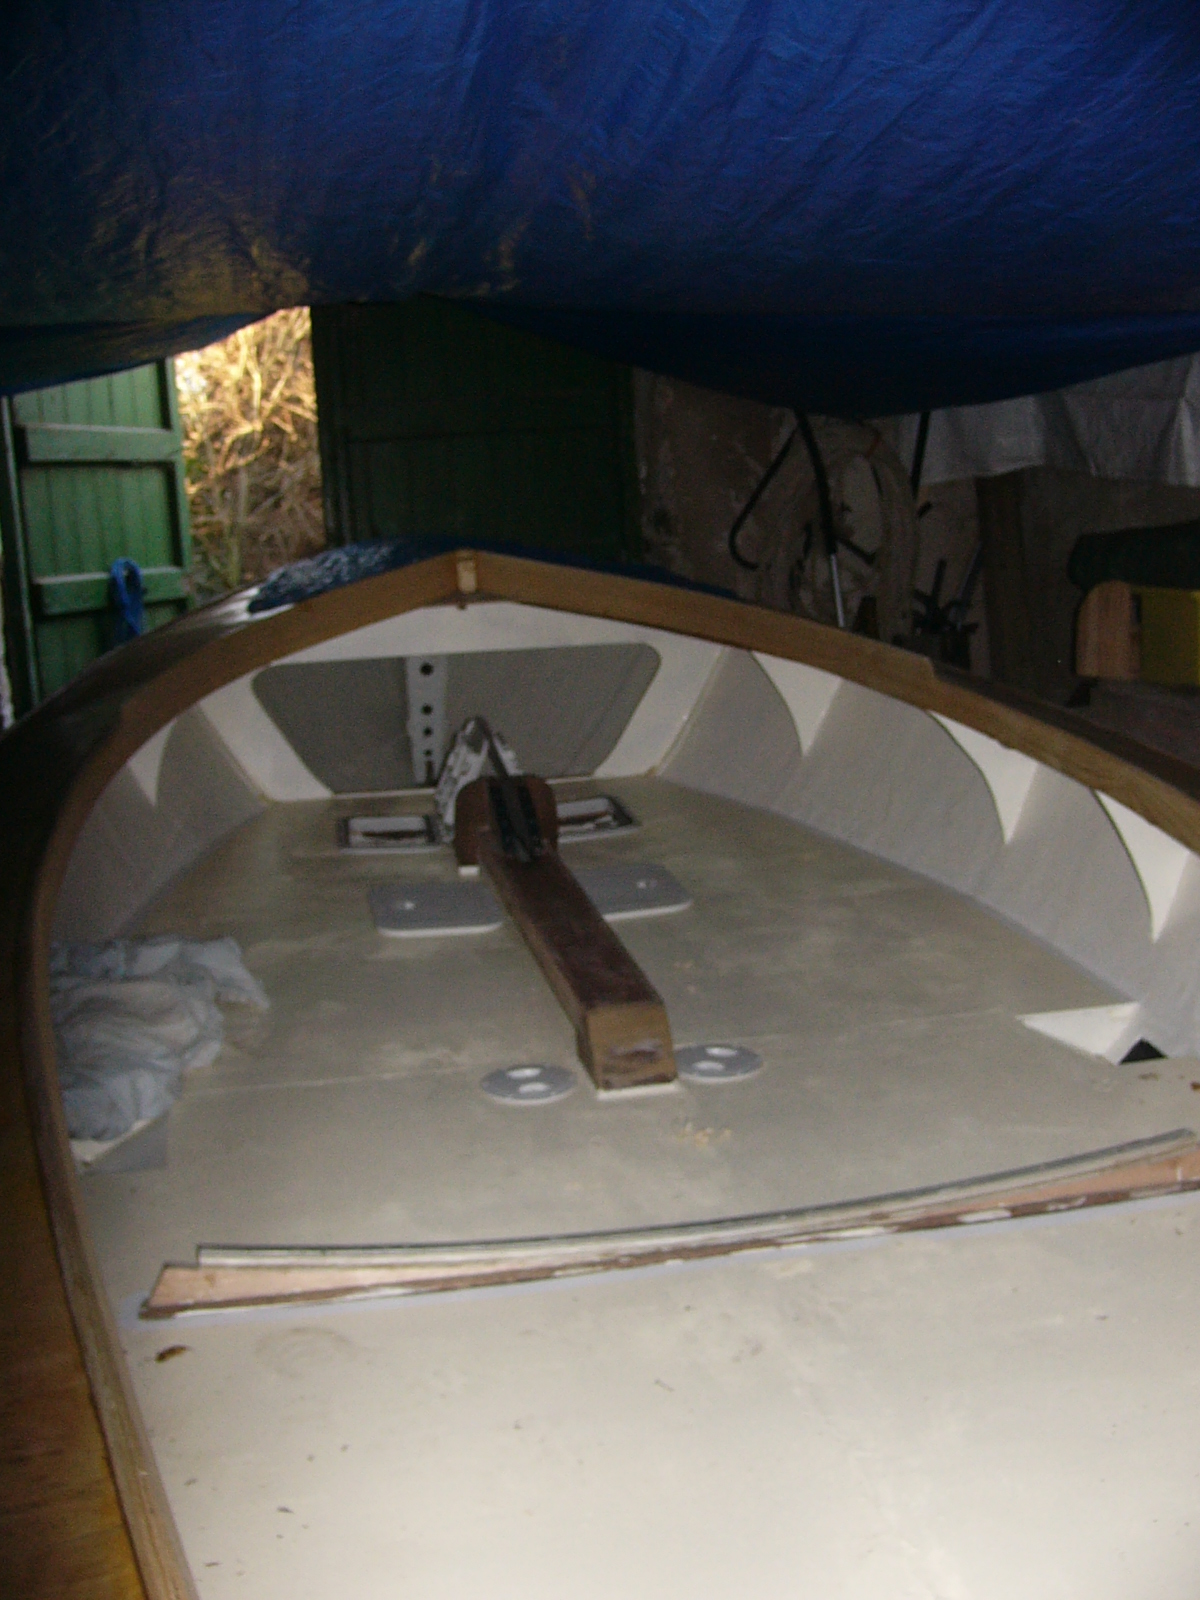
Ready for the cockpit sole to be painted. The large square hatches lead to sealed watertight compartments either side of the centreplate case. There are six watertight compartments in all, each separate from one another. The sole is approximately 3” above the w/line when loaded up. Most water will drain via holes in the transom, but a set of Andersen bailers are sited in wells either side for when it gets a bit wet. The box section into which the mast foot slots in can be seen under the foredeck. I put in a mast ram to adjust the rake of the mast slightly. It operates through a hole in the box.
There’s still a load to do, like finishing off the new rudder, fettling the heavy cast metal plate and then there’s the elephant in the corner – a whole new mast and all the spars needed to finish the rig off.
My enforced ‘rest’ whilst I recuperated from my heart op has meant that very little has been done on Sibrwd over the last couple of years. I have done some work on building a new rudder and stock, along with a tiller, but other things keep on getting in the way, such as Unit 7, the Merlin Rocket and [way down the list] work on the fabric of the house.
Cockpit sole painted with 3 coats Blakes non slip deck paint, and ready to start thinking about bolting and screwing things down. This where we’re at as of the beginning of December 2013, only 5 years into the project!
Part 2 will describe the work needed on the outside, fitting out, building the mast and spars, and hopefully – sailing her!